
A Walk-In Is a 15-Year Commitment. Here's How to Get It Right the First Time.
Looking for the full picture? Read our complete Commercial Refrigeration Buying Guide.
A walk-in cool room isn't a purchase — it's an installation. Once it's built, panelled, sealed, and plumbed into your kitchen, moving it or significantly modifying it costs nearly as much as the original install. This makes the planning stage the most important part of the entire process.
After fitting out 10,000+ commercial kitchens across Australia, I've seen walk-ins planned brilliantly — operations that hum for 15 years without a problem — and walk-ins planned badly, where the owner realises within six months that they've built the wrong size in the wrong spot with the wrong shelving layout. The second scenario costs $8,000–$15,000 to fix. The first costs nothing because the planning was right.
This guide covers everything you need to think about before a single panel goes up: sizing, panel construction, refrigerant systems, compliance, Australian climate considerations, and the real costs you'll face in 2026.
Why Walk-Ins Are Non-Negotiable for High-Volume Kitchens
If you're running 150+ covers per session, catering large events, operating a hotel kitchen, or managing a central production facility, reach-in refrigerators alone can't handle your volume. Here's why:
Capacity. A large double-door reach-in holds 1,400 litres. A modest walk-in (2m × 3m) holds 4,000–6,000 litres. A medium walk-in (3m × 4m) holds 8,000–12,000 litres. The volume difference is transformational — you go from managing stock in two or three cramped reach-ins to having a dedicated cold room where everything has a home.
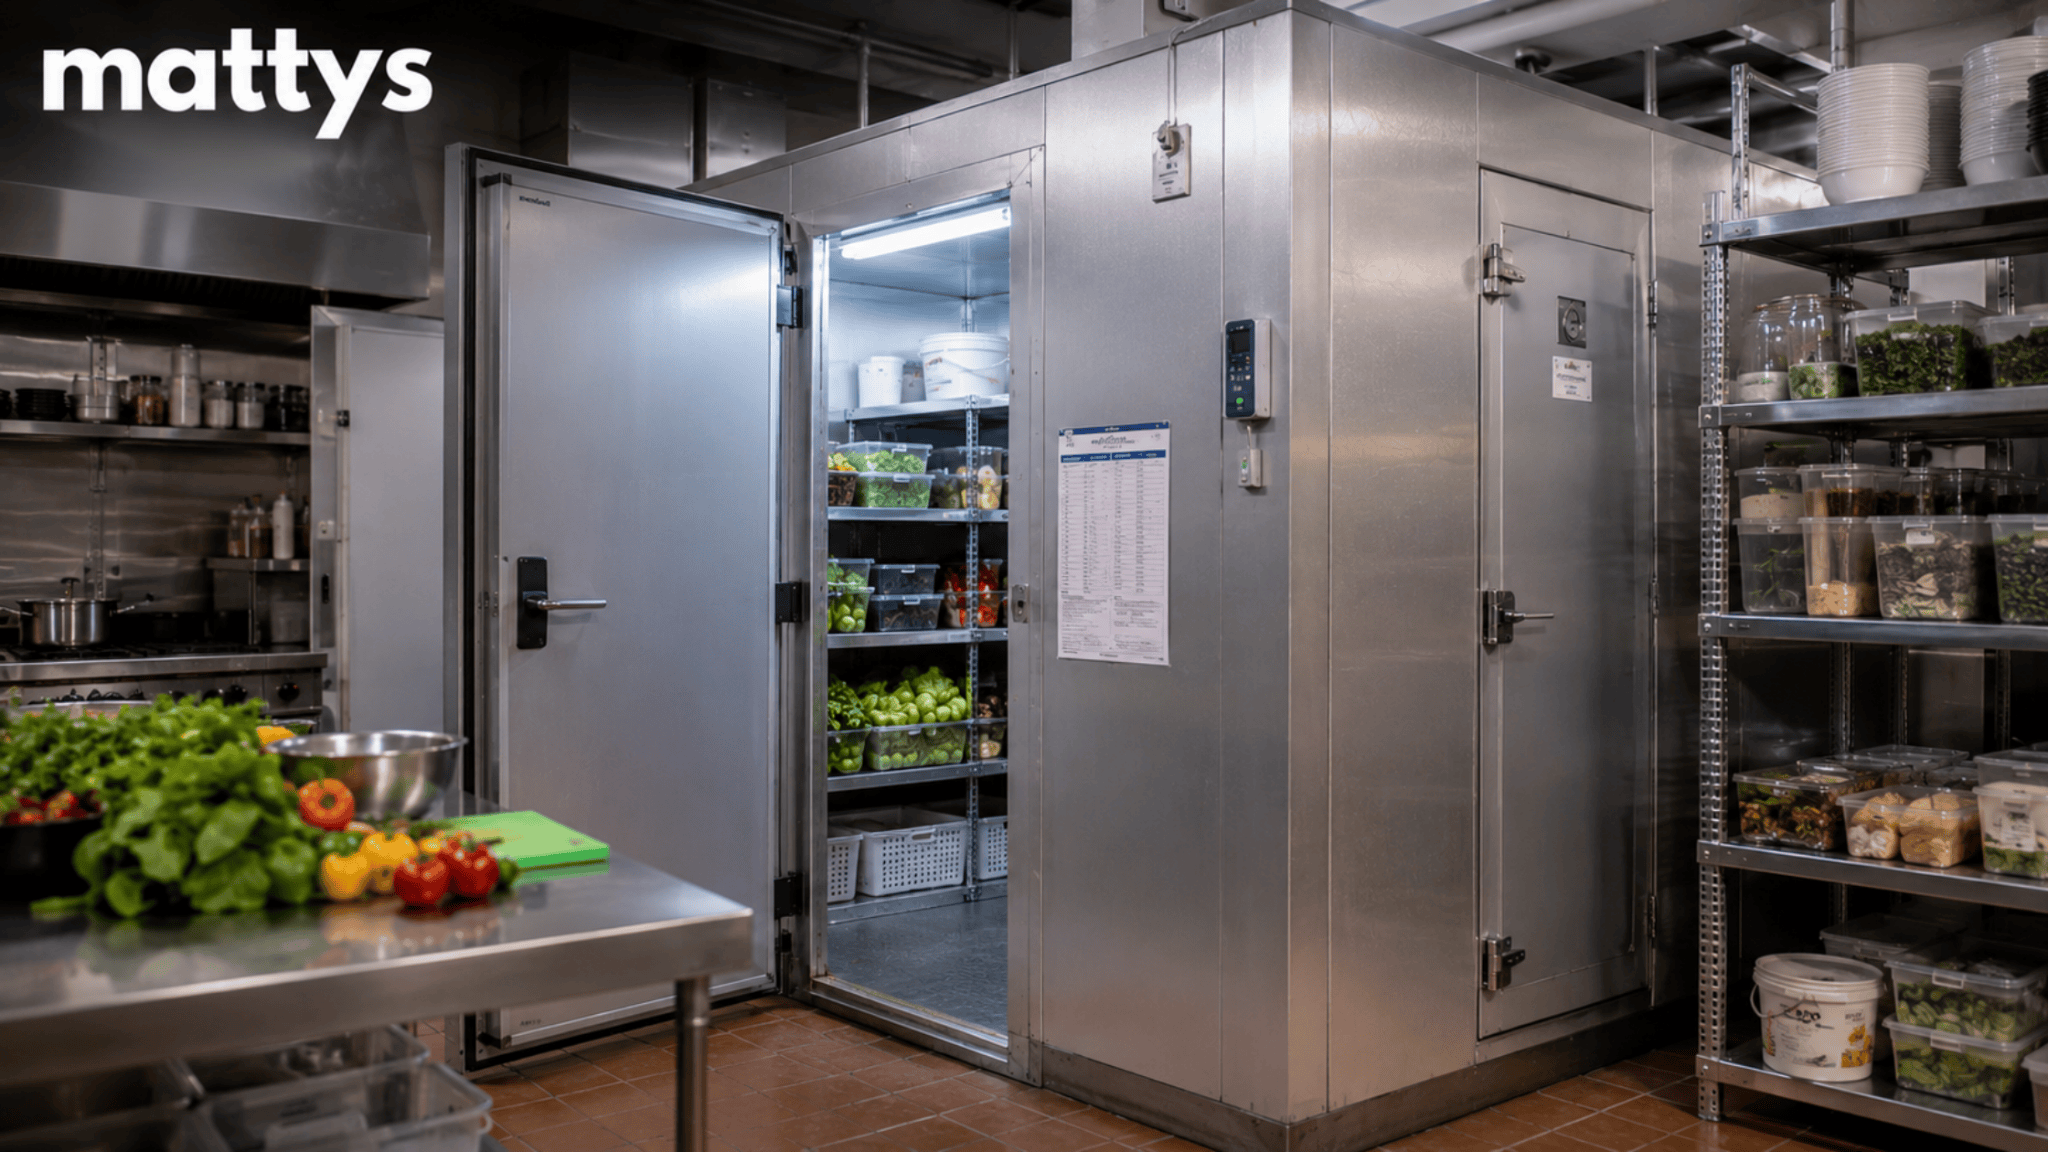
Organisation. Walk-ins allow racking systems — adjustable chrome or stainless shelving running floor to ceiling on three walls. Proteins on one wall. Dairy on another. Vegetables and prep on the third. Delivery intake zones near the door. The spatial layout eliminates cross-contamination risk and speeds up stock rotation.
Delivery handling. When a 200kg delivery arrives, you need somewhere to put it immediately. Reach-ins can't absorb bulk deliveries. A walk-in can — trolleys roll straight in, stock goes onto shelves, and the kitchen continues without disruption.
Labour efficiency. Staff walk in, select items, walk out. No bending into undercounters. No shuffling items in a cramped reach-in to find what's behind them. In high-volume operations, this efficiency gain adds up to 30–60 minutes of saved labour per shift.
Sizing Your Walk-In: The Framework That Works
Step 1: Calculate Peak Storage Volume
Count everything that needs cold storage at your busiest point (typically Friday morning after delivery):
- Proteins: Count by weight (1kg of protein ≈ 2 litres of cold storage space including packaging)
- Dairy and eggs: Count by units (1 litre of milk ≈ 1.2 litres of storage with container clearance)
- Vegetables and salad prep: Count by volume (prep containers typically 15L each)
- Sauces, marinades, mise en place: Count by container (6L Cambros are standard)
- Beverages (if applicable): Count by carton
Step 2: Apply the 60% Rule
Your walk-in should never be more than 60% full at peak. The remaining 40% is airflow space (critical for maintaining even temperature), buffer for delivery timing variations, and seasonal menu expansion room.
Formula: Peak inventory volume ÷ 0.6 = minimum walk-in capacity
Example: A 180-cover restaurant with 3,000 litres of peak cold inventory needs a minimum walk-in capacity of 5,000 litres (3,000 ÷ 0.6).
Step 3: Convert to Dimensions
|
Walk-In Size |
Approximate Capacity |
Suited For |
|
2m × 2m (4m²) |
3,000–4,000L |
Small restaurant (80–120 covers) |
|
2m × 3m (6m²) |
4,500–6,000L |
Medium restaurant (120–180 covers) |
|
3m × 3m (9m²) |
6,500–9,000L |
Large restaurant (180–250 covers) |
|
3m × 4m (12m²) |
9,000–12,000L |
Hotel kitchen, catering facility |
|
4m × 5m (20m²) |
15,000–20,000L |
Central production kitchen |
Height matters too. Standard walk-in panels are 2,400mm. This allows three tiers of shelving (ground + 2 levels) with clearance above for airflow. In spaces with lower ceilings, custom panel heights may be needed — this adds 10–15% to panel costs.
Step 4: Consider Workflow
Door placement. The walk-in door should face the main kitchen workflow — ideally between the delivery entrance and the cooking line. Staff shouldn't walk through the dining area or around obstacles to reach cold storage.
Door type. Standard hinged doors work for most kitchens. High-traffic operations (200+ covers, catering facilities) should consider strip curtains inside the door to reduce cold-air loss during frequent entry, or sliding doors if the swing radius of a hinged door is a problem.
Internal layout. Three-wall shelving is standard. Leave the door wall clear for entry and trolley access. Dedicate specific walls to specific categories (proteins, dairy, veg) and label zones. New staff learn the system in one shift.
Panel Construction: What Your Walk-In Is Made Of
Insulated Panels (Modular Construction)
Modern walk-ins use modular insulated panels — pre-fabricated sections that lock together on-site. This is faster, cheaper, and more thermally efficient than traditional brick-and-mortar cold rooms.
Panel materials:
- Core insulation: Polyurethane foam (PUR) or polyisocyanurate (PIR), typically 75–100mm thick. PIR offers slightly better thermal performance per millimetre and better fire resistance.
- Skin material: Stainless steel (food-grade, easy to clean, corrosion-resistant) or colour-bonded steel (cheaper, adequate for external panels not exposed to food).
- Joints: Cam-lock or tongue-and-groove systems that create airtight seals without adhesive.
What to specify:
- Minimum 80mm panel thickness for cool rooms (0–5°C)
- Minimum 100mm panel thickness for freezer rooms (-18°C or below)
- Stainless steel interior skin on all food-contact walls
- Floor panels with anti-slip surface and load rating appropriate for trolley traffic
- Hygienic coving (rounded corners between wall and floor) for easy cleaning and FSANZ compliance
Ceiling and Floor Considerations
Ceiling: Walk-in panels must support the weight of the refrigeration unit (typically mounted on top). Ensure the building's ceiling can also support the combined weight of the walk-in ceiling panel plus the condensing unit (150–300kg depending on system size).
Floor: Two options — floor panels (walk-in includes its own insulated floor, sits on the existing floor) or floorless (the walk-in sits on a concrete slab that's been insulated and sealed separately). Floor panels are faster to install but create a step at the door. Floorless designs allow flush entry (ideal for trolley access) but require more building preparation.
Our recommendation: For new installations, use floor panels with a ramp at the door for trolley access. It's faster to install, thermally superior, and doesn't require modifying the building's floor slab.
Refrigeration Systems: What Keeps It Cold
Self-Contained vs. Remote Systems
Self-contained: The condensing unit sits on top of or directly beside the walk-in. All refrigeration components are in one location. Simpler installation, lower cost, easier maintenance.
Remote: The condensing unit is located outside the building (typically on a roof or external wall) and connected to the walk-in via refrigerant lines. This removes heat and noise from the kitchen but requires more complex installation and piping.
|
Factor |
Self-Contained |
Remote |
|
Installation cost |
Lower ($3,000–$6,000) |
Higher ($6,000–$12,000) |
|
Noise in kitchen |
Noticeable (compressor nearby) |
Minimal (compressor outside) |
|
Heat in kitchen |
Adds heat to kitchen space |
Dumps heat outside |
|
Maintenance access |
Easy (unit is accessible) |
Requires roof/external access |
|
Best for |
Small-medium walk-ins, budget-conscious |
Large walk-ins, noise-sensitive kitchens |
Our recommendation: For walk-ins under 9m², self-contained systems are cost-effective and simple. For 9m²+ or any kitchen where noise and heat are concerns, go remote.
Refrigerant Options (2026)
R290 (Propane): The default for new self-contained systems. Low GWP, high energy efficiency, stable pricing. Charge limits apply (typically 150g maximum per circuit for self-contained), which limits R290 to smaller systems.
R744 (CO₂): Increasingly used for larger remote systems and walk-in applications where R290 charge limits are too restrictive. Excellent efficiency in cold-climate applications. Higher system cost but zero direct GWP.
R449A / R448A: Transitional HFC blends used in some remote systems. Lower GWP than R404A but still subject to HFC phase-down quotas. Being phased out in favour of natural refrigerants.
What to avoid: Any system using R404A. It's the highest-GWP refrigerant still in limited circulation, recharge costs are skyrocketing due to import quotas, and technicians are increasingly reluctant to service legacy R404A systems.
Budget Reality: Walk-In Cool Room Costs in Australia (2026)
|
Component |
2m × 2m |
2m × 3m |
3m × 3m |
3m × 4m |
|
Panel kit |
$6,000–$9,000 |
$8,000–$12,000 |
$11,000–$16,000 |
$14,000–$20,000 |
|
Refrigeration system |
$4,000–$6,000 |
$5,000–$8,000 |
$6,500–$10,000 |
$8,000–$14,000 |
|
Shelving (3-wall racking) |
$2,000–$3,500 |
$3,000–$5,000 |
$4,000–$6,500 |
$5,000–$8,000 |
|
Installation labour |
$3,000–$5,000 |
$4,000–$6,000 |
$5,000–$8,000 |
$6,000–$10,000 |
|
Electrical + plumbing |
$2,000–$3,500 |
$2,500–$4,000 |
$3,000–$5,000 |
$3,500–$6,000 |
|
Total installed |
$17,000–$27,000 |
$22,500–$35,000 |
$29,500–$45,500 |
$36,500–$58,000 |
Annual running costs:
|
Walk-In Size |
kWh/day |
Weekly Cost @ 38¢/kWh |
Annual Cost |
|
2m × 2m |
6–8 |
$57–$76 |
$2,964–$3,952 |
|
2m × 3m |
8–12 |
$76–$114 |
$3,952–$5,928 |
|
3m × 3m |
10–15 |
$95–$143 |
$4,940–$7,410 |
|
3m × 4m |
14–20 |
$133–$190 |
$6,916–$9,880 |
Annual maintenance: $600–$1,200 (annual professional service + monthly cleaning supplies)
Lifespan: 15–20 years for quality modular panels with properly maintained refrigeration. Some operators run walk-ins for 25+ years with compressor replacements at the 12–15 year mark.
Australian Compliance Requirements
Building and Council Approval
Walk-in cool rooms are classified as fixtures and may require building approval depending on your local council and the scope of installation. Check with your council before committing to a design.
Typical requirements:
- Development Application (DA) or Complying Development Certificate (CDC) depending on scale
- Compliance with the Building Code of Australia (BCA) for fire rating, structural load, and egress
- Plumbing approval if the walk-in has a floor drain (most do)
- Electrical approval for dedicated circuits (walk-ins typically require a dedicated 15A or 20A circuit)
GEMS/MEPS Compliance
Walk-in refrigeration systems (specifically the condensing units) may fall under GEMS registration requirements depending on their classification. Self-contained walk-in cabinets are more likely to be in-scope than custom-built remote systems. Ask your installer for GEMS compliance documentation.
Food Safety (FSANZ)
Walk-ins must maintain 0–5°C for standard cool rooms and -18°C or below for freezer rooms. FSANZ requires:
- Temperature monitoring and logging (digital monitoring with alarm systems recommended)
- Internal surfaces that are smooth, impervious, and cleanable
- Hygienic coving at wall-floor junctions
- Adequate lighting for stock identification
- Door handles that can be operated from inside (safety requirement — prevents lock-in)
Fire Rating
Walk-in panels must meet fire rating requirements specified in the BCA. PIR-core panels generally offer better fire resistance than PUR-core panels. Check that your panel supplier provides fire test certificates.
Customer Story: How a Sydney Hotel Kitchen Planned for Growth
The situation: A 200-room hotel in Sydney CBD was renovating its kitchen. Current walk-in was a 2m × 2m unit installed in 2008 — too small for the hotel's expanding banquet and room-service operations.
The challenge: The hotel needed capacity for 300+ covers per service (restaurant + banquets + room service) but had limited floor space in the existing kitchen footprint.
What we recommended: A 3m × 4m walk-in cool room with remote condensing unit (located on the building's service deck). Internal layout: three-wall racking with a dedicated banquet-prep zone. Temperature monitoring system with SMS alerts for overnight fluctuation.
The install: Panel kit + remote system + racking + installation + electrical: $48,000 total. Installation time: 5 working days (kitchen was operational throughout, with temporary refrigeration in place).
The result: The hotel now handles 300+ covers without storage constraints. Delivery intake takes 15 minutes instead of 45 (stock rolls straight in on trolleys). Temperature consistency is maintained at 2–3°C with zero fluctuation events in 18 months. The investment pays for itself through reduced stock wastage and labour efficiency within 4 years.
"The old walk-in was holding us back. We didn't realise how much time and stock we were wasting until we had proper capacity. The planning process with Mattys made it straightforward."
— Executive Chef, Sydney CBD hotel
Mistakes to Avoid
Mistake 1: Sizing for today, not for growth
Build 20–30% larger than your current need. Your menu will expand. Your covers will grow. A walk-in that's too small in year 3 costs $15,000+ to replace. Building slightly larger costs $3,000–$5,000 more upfront.
Mistake 2: Ignoring door placement and traffic flow
The walk-in door should face your main kitchen workflow. If staff walk through storage areas, past prep stations, or around corners to reach the walk-in, you're wasting 20+ minutes of labour per shift.
Mistake 3: Skipping temperature monitoring
A walk-in without digital temperature monitoring is a food safety liability. If the compressor fails overnight and you don't know until morning, you could lose $5,000–$15,000 in stock. Temperature monitoring with SMS/email alerts costs $500–$1,500 to install and prevents catastrophic losses.
Mistake 4: Choosing floorless construction without proper slab preparation
A floorless walk-in on an uninsulated concrete slab loses significant thermal energy through the floor. The compressor works harder, energy costs rise, and condensation forms at the slab-panel junction. If going floorless, invest in proper slab insulation and vapour barrier.
FAQ
Q: How long does walk-in installation take?
A: Modular panel assembly typically takes 1–2 days. Total installation including refrigeration, electrical, and shelving takes 3–5 working days. Remote systems with external condensing units may take an additional 1–2 days for piping.
Q: Can I install a walk-in in a rented space?
A: Yes, but check your lease. Modular walk-ins can be disassembled and relocated (at a cost of $5,000–$10,000 for removal and reinstallation). If your lease is short-term (under 3 years), factor relocation costs into your ROI calculation.
Q: What happens if the compressor fails?
A: A well-insulated walk-in will hold temperature for 4–8 hours without the compressor running (doors closed). This gives you time to arrange emergency repair. Temperature monitoring with alerts ensures you know about the failure immediately, even at 3am.
Q: Do I need a walk-in freezer as well?
A: Depends on your operation. Hotels and large restaurants typically need both cool room (0–5°C) and freezer room (-18°C). Smaller operations can often manage with a walk-in cool room plus a standalone upright freezer. We can help you assess whether a combined cool/freezer room is cost-effective for your volume.
Q: What's the payback period on a walk-in?
A: For a $30,000 walk-in replacing multiple reach-ins: typically 3–4 years through energy savings, labour efficiency, and reduced stock wastage. For a first-time installation enabling higher-volume operations: often within 18 months through increased revenue capacity.
← Back to the Commercial Refrigeration Buying Guide
Next Steps
A walk-in cool room is a 15–20 year asset. The planning you do now determines whether it's a quiet operational backbone or an expensive headache. Take the time to size correctly, spec for growth, and choose quality panels and refrigeration that will last.
We've designed and installed walk-ins for hotel kitchens, catering facilities, restaurants, and production kitchens across Australia. We know the compliance requirements, the panel suppliers, the refrigeration options, and the installation process. We'll walk you through it.
📞 Call us: 1300 628 897 — discuss your walk-in requirements with someone who's installed hundreds
🛒 Browse walk-in components here — panels, shelving, refrigeration systems
💰 Rent-Try-Buy not applicable — walk-ins are custom installations, but we offer staged payment options for qualifying operators
Share:
Undercounter Fridges vs. Reach-Ins: Which Is Right for Your Kitchen?
MEPS Compliance & Energy Efficiency: What Every Australian Kitchen Operator Needs to Know